
Thursday, December 24, 2009

Monday, August 31, 2009
How to Completely Encrypt your Hard drive
This tutorial assumes you have basic knowledge in partition editing. Go here if you don't.
About a year ago I stumbled on TrueCrypt, Open Source encryption software which by definition allows government level encryption (AES) . Encrypting your Hard drive can help you in a lot of situations and it only sacrifices 30 minutes of your valuable time.
Optional: Create a backup of your entire hard drive on a separate storage device now
Optional: Create a TrueCrypt Rescue disc
First of all you will want to Create an empty partition. Use any partition editing software for this, I prefer gparted as it's free and open source. The partition needs to support the OS you will install on it (format and size wise).
Next install any OS (operating system) on that partition. The OS on this partition does not have to be the OS you want to use later on so go ahead and install an Open Source OS to save yourself some copyright issues. The OS's only requirements is that it needs to be able to run TrueCrypt (Linux, Mac, Windows). Set up some drivers if needed (windows...) and get the OS up to speed. Next install TrueCrypt on the partition. Lastly install a boot loader on your computer if you don't already have one. I recommend grub (what's a bootloader?).
Clone the partition you just created. One partition will be your backup to work from if something goes wrong , this partition can be deleted later on, just keep it until you are sure everything is running smoothly. Now boot into your backup partition and run TrueCrypt. Select:
System > Encrypt System Partition/Drive...
Select normal press Next.
Select Encrypt the System Partition and press Next.
Select Multi-Boot and press Next.
Just answer the next view questions truthfully (hint: use your brain).
Wait and Watch as it encrypts your OS.
The TrueCrypt Boot-loader should now be installed on your boot-hard drive.
Enjoy your Encrypted OS =)
Continue Reading if you are either very paranoid or very illegal
But wait, what if Authorities or the Mafia force you to reveal the password to your OS?
Well this is where Plausible Deniability comes into play.
You may create a hidden OS inside your already encrypted OS. It is impossible to know whether a hidden volume exists on your computer as it looks exactly the same as random bits, the only pointer to it is a password you choose.
To create a hidden OS boot into your Encrypted OS and Start TrueCrypt.
System > Encrypt System Partition/Drive...
Select hidden volume this time.
You should be familiar with the steps...
You now have a Hidden OS inside an Encrypted OS. To boot into your hidden OS simply enter the password you choose for it. To boot into your Encrypted OS just enter your old password.
What do you do if someone forces you to reveal your password?
Give them the password of your Encrypted OS. They don't have proof that you have a hidden OS so don't give them any reason to believe so.
Now how do we make the Denial of a Hidden OS Plausible?
Every now and then do something (legal) on your Encrypted OS, this will make it look like you actively use it. I have some scripts which I run now and then to surf the web for me and do other random stuff, I might release them but you should be able to come up with your own.
Enjoy =D
About a year ago I stumbled on TrueCrypt, Open Source encryption software which by definition allows government level encryption (AES) . Encrypting your Hard drive can help you in a lot of situations and it only sacrifices 30 minutes of your valuable time.
Optional: Create a backup of your entire hard drive on a separate storage device now
Optional: Create a TrueCrypt Rescue disc
First of all you will want to Create an empty partition. Use any partition editing software for this, I prefer gparted as it's free and open source. The partition needs to support the OS you will install on it (format and size wise).
Next install any OS (operating system) on that partition. The OS on this partition does not have to be the OS you want to use later on so go ahead and install an Open Source OS to save yourself some copyright issues. The OS's only requirements is that it needs to be able to run TrueCrypt (Linux, Mac, Windows). Set up some drivers if needed (windows...) and get the OS up to speed. Next install TrueCrypt on the partition. Lastly install a boot loader on your computer if you don't already have one. I recommend grub (what's a bootloader?).
Clone the partition you just created. One partition will be your backup to work from if something goes wrong , this partition can be deleted later on, just keep it until you are sure everything is running smoothly. Now boot into your backup partition and run TrueCrypt. Select:
System > Encrypt System Partition/Drive...
Select normal press Next.
Select Encrypt the System Partition and press Next.
Select Multi-Boot and press Next.
Just answer the next view questions truthfully (hint: use your brain).
Wait and Watch as it encrypts your OS.
The TrueCrypt Boot-loader should now be installed on your boot-hard drive.
Enjoy your Encrypted OS =)
Continue Reading if you are either very paranoid or very illegal
But wait, what if Authorities or the Mafia force you to reveal the password to your OS?
Well this is where Plausible Deniability comes into play.
You may create a hidden OS inside your already encrypted OS. It is impossible to know whether a hidden volume exists on your computer as it looks exactly the same as random bits, the only pointer to it is a password you choose.
To create a hidden OS boot into your Encrypted OS and Start TrueCrypt.
System > Encrypt System Partition/Drive...
Select hidden volume this time.
You should be familiar with the steps...
You now have a Hidden OS inside an Encrypted OS. To boot into your hidden OS simply enter the password you choose for it. To boot into your Encrypted OS just enter your old password.
What do you do if someone forces you to reveal your password?
Give them the password of your Encrypted OS. They don't have proof that you have a hidden OS so don't give them any reason to believe so.
Now how do we make the Denial of a Hidden OS Plausible?
Every now and then do something (legal) on your Encrypted OS, this will make it look like you actively use it. I have some scripts which I run now and then to surf the web for me and do other random stuff, I might release them but you should be able to come up with your own.
Enjoy =D
Wednesday, July 29, 2009
First Computer Build
I just finished building my first computer =D
Gotta install the OS now...
More Details Really Really Soon =D
Edit:
System:
CPU: Phenom II x3 720 BE
Motherboard: ASRock M3A780GXH 128M
Case: Antec 900
Power Supply: AQTIS Double Graphic Power AP-650GTX
Memory: Just Some DDR3
Hard Drive: 1tb (Hitachi)
and a simple DVD/CD Reader/Writer
It doesn't have a Graphics Card yet but I'm going to get one soon (probably around Radeon 4770 HD or more). The integrated Motherboard Graphics (ATI Radeon 3200 HD) are doing fine so far but then again I've only tried Compiz Fusion and some Screen savers =D
It runs stable and it looks really great next to my old build:
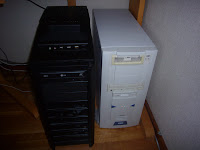
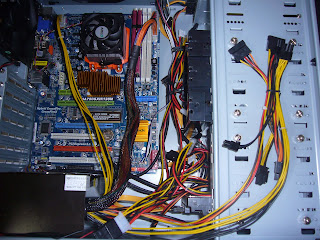
Of course there is a huge mess of cables but then again it's my first and I'm happy all the parts I chose work together as expected =D
And just for giggles here's the trusty glass penguin always sitting on my desk:

Gotta install the OS now...
More Details Really Really Soon =D
Edit:
System:
CPU: Phenom II x3 720 BE
Motherboard: ASRock M3A780GXH 128M
Case: Antec 900
Power Supply: AQTIS Double Graphic Power AP-650GTX
Memory: Just Some DDR3
Hard Drive: 1tb (Hitachi)
and a simple DVD/CD Reader/Writer
It doesn't have a Graphics Card yet but I'm going to get one soon (probably around Radeon 4770 HD or more). The integrated Motherboard Graphics (ATI Radeon 3200 HD) are doing fine so far but then again I've only tried Compiz Fusion and some Screen savers =D
It runs stable and it looks really great next to my old build:

Of course there is a huge mess of cables but then again it's my first and I'm happy all the parts I chose work together as expected =D

And just for giggles here's the trusty glass penguin always sitting on my desk:

Wednesday, July 1, 2009
Website Backups
Today I made a Website Backup. This post has nothing to do with the Server I'm currently working on. Unfortunately I didn't get time to work on it, as I promised myself that I would only work on it for an entire day at the minimum.
I made the site backup using the FileZilla FTP Client. Of course it runs on Linux, otherwise I wouldn't use it. It's quite convenient, here's a (huge) screenshot of it running:
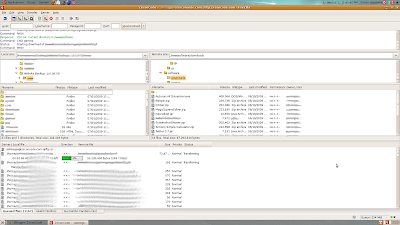
And yes, the blurry parts are not some cool graphic effects of the program, they where added in by me using GIMP for security reasons.
The backup took me quite some time. After realising it was going to take longer than expected, I wanted to know what exactly was so space consuming on my server. My first guess was correct, the pictures where to blame. In dismay I realised I had forgotten to compress them before uploading. This obviously wasn't good, so I started GIMP and slowly re-saved every picture at a lower quality. Of course this could have been done using a macro but there weren't that many pictures and I was bored. As a result my site may (should) load quicker now.
And that's all for today, just a quick post about my site Backups =)
I made the site backup using the FileZilla FTP Client. Of course it runs on Linux, otherwise I wouldn't use it. It's quite convenient, here's a (huge) screenshot of it running:

And yes, the blurry parts are not some cool graphic effects of the program, they where added in by me using GIMP for security reasons.
The backup took me quite some time. After realising it was going to take longer than expected, I wanted to know what exactly was so space consuming on my server. My first guess was correct, the pictures where to blame. In dismay I realised I had forgotten to compress them before uploading. This obviously wasn't good, so I started GIMP and slowly re-saved every picture at a lower quality. Of course this could have been done using a macro but there weren't that many pictures and I was bored. As a result my site may (should) load quicker now.
And that's all for today, just a quick post about my site Backups =)
Saturday, June 27, 2009
Server Day 1 - Brainstorming
During this great and incredible summer vacation I'm going to attempt to program a server. This server will be part of my MMORPG, hence the title. Today I just brainstormed what and how the server will act like.
First of all I had to decide on the protocol. While UDP is very quick, it's not very reliable. Packets may get lost a long the way and there is no way to know if they arrive in the same order that they where sent. TCP is of course the opposite. It is very reliable, however it is of course slower. I choose to go with TCP. The reason is that I need a reliable connection between my Server and Client to debug the Server easily. TCP is also easier to implement, which is an added bonus. Maybe when the server is up and running I will switch some things the server sends in an endless stream (like the players locations) to a UDP protocol to ease the load.
The serve will be programmed in C. The reason being is that C is very quick and reliable once all bugs have been found. I do not now C fully yet, however for the last month or so I have been playing around with C and some parts are extremely similar to Java, my current all time favorite. I'll have to learn a little bit of C while programming this server, not to speak of the idea of sockets, something which I have never looked at before. Overall this server will be a tremendous learning experience, I will have gained a lot from it even if it ends up in heaps and ashes (something which I am positive won't happen) =D
The server will run on Linux. Linux is just more reliable. Period. My chosen Linux OS is Ubuntu. The reason behind this is that I have been using Ubuntu for the past year now and only switched to windows for the occasionally PowerPoint presentation I had to create for "educational means". I have my old computer lying around and I thought I might install Ubuntu on it and see where it goes from there =D
Now how do I test the server? Well my idea is that I will connect my main computer to my old computer (via LAN of course). After that I 'm going to install SSH on my old computer so I can compile and run the C code through SSH. That's what I'm going to try to do next.
This post has become very long and I hate to see it end, but if I would write about everything I have brainstormed the next few posts would look like nothing you've ever seen, simply because you wouldn't be able to see them =D
First of all I had to decide on the protocol. While UDP is very quick, it's not very reliable. Packets may get lost a long the way and there is no way to know if they arrive in the same order that they where sent. TCP is of course the opposite. It is very reliable, however it is of course slower. I choose to go with TCP. The reason is that I need a reliable connection between my Server and Client to debug the Server easily. TCP is also easier to implement, which is an added bonus. Maybe when the server is up and running I will switch some things the server sends in an endless stream (like the players locations) to a UDP protocol to ease the load.
The serve will be programmed in C. The reason being is that C is very quick and reliable once all bugs have been found. I do not now C fully yet, however for the last month or so I have been playing around with C and some parts are extremely similar to Java, my current all time favorite. I'll have to learn a little bit of C while programming this server, not to speak of the idea of sockets, something which I have never looked at before. Overall this server will be a tremendous learning experience, I will have gained a lot from it even if it ends up in heaps and ashes (something which I am positive won't happen) =D
The server will run on Linux. Linux is just more reliable. Period. My chosen Linux OS is Ubuntu. The reason behind this is that I have been using Ubuntu for the past year now and only switched to windows for the occasionally PowerPoint presentation I had to create for "educational means". I have my old computer lying around and I thought I might install Ubuntu on it and see where it goes from there =D
Now how do I test the server? Well my idea is that I will connect my main computer to my old computer (via LAN of course). After that I 'm going to install SSH on my old computer so I can compile and run the C code through SSH. That's what I'm going to try to do next.
This post has become very long and I hate to see it end, but if I would write about everything I have brainstormed the next few posts would look like nothing you've ever seen, simply because you wouldn't be able to see them =D
Friday, June 12, 2009
Exams Ended & Got tons to Do !
Those terrible terrible worthless ugly exams are over!
I have two months of free time now! YAY!
Jealous Much?
Here's all the fun stuff I'm planning to do:
(I'll strike them out as I finish them)
- Get my Site up to Date
-- Update Articles
-- Update Software Section
-- Maybe add a Login Section
-- Add Comment Section
-- Add a ToDo list
-- Finish of the CSS
- Create a New Blogger Style
-- Similar to Style of my Site
- Install SSH on an OLD laptop
-- Wipe HardDrive
-- Somehow get a Command Line Running
-- Note: Windows and X Window Server don't work
- Help a Friend finish psp.zirconcode.com
- Read a Book on the Linux Kernel
-- 19 / 19 Chapters Left to Read
Those are the things which I'm going to finish first. After that, I'm going to start on the more heavy stuff =D
Edit:
The ToDo list has moved to my sites ToDo section.
I have two months of free time now! YAY!
Jealous Much?
Here's all the fun stuff I'm planning to do:
(I'll strike them out as I finish them)
- Get my Site up to Date
-- Update Articles
-- Update Software Section
-- Maybe add a Login Section
-- Add Comment Section
-- Add a ToDo list
-- Finish of the CSS
- Create a New Blogger Style
-- Similar to Style of my Site
- Install SSH on an OLD laptop
-- Wipe HardDrive
-- Somehow get a Command Line Running
-- Note: Windows and X Window Server don't work
- Help a Friend finish psp.zirconcode.com
- Read a Book on the Linux Kernel
-- 19 / 19 Chapters Left to Read
Those are the things which I'm going to finish first. After that, I'm going to start on the more heavy stuff =D
Edit:
The ToDo list has moved to my sites ToDo section.
Monday, May 25, 2009
Exams coming up
Yup, that's right. I have exams in exactly two weeks. I apologise, I don't have much time at hand right now to do anything, I'm wasting using up all my time studying.
And guess what the good news is?
After that I get a 2 month vacation =D
Plans for Summer Break:
1. Finish of Website (remove bugs, update content)
2. Work on a MMORPG (hopefully finish Beta!)
3. Work on my Neural Net
4. Write tons of tutorials (AI/HTML/CSS/DOS/BASH/PHP/C/Java/Delphi/etc...)
5. Have Fun =D
I really can't wait =(
And guess what the good news is?
After that I get a 2 month vacation =D
Plans for Summer Break:
1. Finish of Website (remove bugs, update content)
2. Work on a MMORPG (hopefully finish Beta!)
3. Work on my Neural Net
4. Write tons of tutorials (AI/HTML/CSS/DOS/BASH/PHP/C/Java/Delphi/etc...)
5. Have Fun =D
I really can't wait =(
Sunday, May 10, 2009
Website Remake
Just a quick update since I don't have much time right now:
I just re-created my websites (www.zirconcode.com) style and it looks a lot better to me now. Maybe I'll Open Source my old style, it might help somebody. Next I'm going to update and organise ALL the content on it. I don't know yet what to do after that, probably work on one of my projects again.
Have a nice day =D
I just re-created my websites (www.zirconcode.com) style and it looks a lot better to me now. Maybe I'll Open Source my old style, it might help somebody. Next I'm going to update and organise ALL the content on it. I don't know yet what to do after that, probably work on one of my projects again.
Have a nice day =D
Thursday, April 30, 2009
Learning BASH (part 1)
What's BASH?
BASH (GNU Bourne-Again SHell) is the scripting language used in mostly Linux Environments. If you don't know what Linux is or don't have a Linux based OS installed on your computer right now visit: http://www.linux.com/whatislinux/114354. For this blog post, I will recklessly assume that you are using Ubuntu, as that's what I'm using right now. If you're not using Ubuntu, things will hopefully work out anyway (they should, at least). BASH and Linux can be compared to DOS and Windows.
Why Learn It?
If your Operating System doesn't boot any more, booting into a BASH console (Ubuntu recovery mode) instead into an X Window Server (the thing which manages the windows which you're probably looking at) is a great and easy way to recover your files and fix your booting process. BASH can also be an easy and quick way to get things done around your great open source OS.
How to Learn It:
Now that I've (hopefully) convince you to learn BASH, let's learn it =D
First of all, you will need to find a way to access a BASH console. In Ubuntu such a terminal can be found under: /usr/bin/gnome-terminal (navigate to /usr/bin/ and double click on gnome-terminal to open it). I suggest you create a shortcut to it by dragging it onto your Desktop while holding CTRL + SHIFT.
Once open, you will hopefully see this (if Simon is your name and Simon-Ubuntu-8 is your computers name):
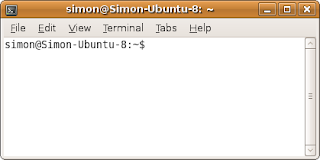
Want to change the Colors to something (hopefully) better looking? Click on "Edit" in the toolbar, then click on "Profile Preferences" on the drop down menu. Finally click on the "Colors" tab on the window which just opened. After changing the colors to what you want them to be, close the options window and lets get started =D
Do you see the "$" at the end of the first line on the terminal? That means the terminal is waiting for you to command it. Let's not make it wait for too long =D
Make sure the terminal window has your mouse focus by clicking on it, then type:
man
Hopefully the terminal replied like this:
What manual page do you want?
And then displaying your name and the "$" sign once again, ready for the next command.
Now what have you just done? You have told the console to run a file called "man" (stands for manual) and to display the results. Do you want to know where the "man" file is located?
Type in:
which man
And here's what I got:
/usr/bin/man
As you can see, typing in "which" and then a command name will tell you the file where that command is stored. Now let's go back to the "man" command. Typing in "man" and then a command name will tell you everything about that command.
Try typing:
man ls
You will get something which looks like this:
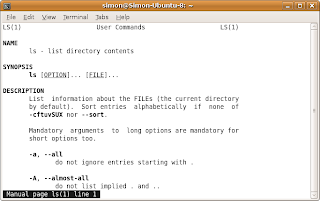
If you look at the bottom left corner, it will tell you what you are looking at and the line you are currently on. You can navigate up and down by using (Surprise!) the UP and DOWN arrow keys. Once you are done reading about the "ls" command you can press Q (as in Quit) to go back to your familiar console. The "man" command is VERY IMPORTANT, use it to check up on commands you don't know about before you use them. ALWAYS.
As you have hopefully figured out by now, the "ls" command lists the files of the directory you are currently looking at. Try it out if you want to =D
That's all nice and good but how do you know in which directory you are at the moment, and how do you change it?
Do a man look up on "pwd" by typing:
man pwd
After reading, press Q to exit, as I told you above.
Hopefully you have figured it out by now, the "pwd" command Prints the Working Directory, so the directory you are currently in.
Try it:
pwd
I got:
/home/simon
Now you could type:
ls
To get a list of files in the /home/simon directory.
Now how do we navigate around our directories?
Use the "cd" command. Typing in "man cd" gets you: "No manual entry for cd", so don't even bother. Instead, read this: Typing "cd" and a sub-directory name will change your current directory to that.
Let's try it =D
Find your current directory by typing:
pwd
Here's mine:
/home/simon
Now type "cd" and a sub-directory:
cd Desktop
Then find your current directory again by typing:
pwd
And be surprised, it changed:
/home/simon/Desktop
Here are some other useful things you can do with the "cd" command:
Type in "cd /" to navigate to the root directory.
Type in "cd .." move to the parent directory.
The End (for now).
What, but there is so much left to learn?!
Yes, there is. I will write more later this week (hopefully). This tutorial was quite fun to write so I think I will make a tutorial series.
In the mean time, look up these basic commands (using "man" or Google):
BASH (GNU Bourne-Again SHell) is the scripting language used in mostly Linux Environments. If you don't know what Linux is or don't have a Linux based OS installed on your computer right now visit: http://www.linux.com/whatislinux/114354. For this blog post, I will recklessly assume that you are using Ubuntu, as that's what I'm using right now. If you're not using Ubuntu, things will hopefully work out anyway (they should, at least). BASH and Linux can be compared to DOS and Windows.
Why Learn It?
If your Operating System doesn't boot any more, booting into a BASH console (Ubuntu recovery mode) instead into an X Window Server (the thing which manages the windows which you're probably looking at) is a great and easy way to recover your files and fix your booting process. BASH can also be an easy and quick way to get things done around your great open source OS.
How to Learn It:
Now that I've (hopefully) convince you to learn BASH, let's learn it =D
First of all, you will need to find a way to access a BASH console. In Ubuntu such a terminal can be found under: /usr/bin/gnome-terminal (navigate to /usr/bin/ and double click on gnome-terminal to open it). I suggest you create a shortcut to it by dragging it onto your Desktop while holding CTRL + SHIFT.
Once open, you will hopefully see this (if Simon is your name and Simon-Ubuntu-8 is your computers name):

Want to change the Colors to something (hopefully) better looking? Click on "Edit" in the toolbar, then click on "Profile Preferences" on the drop down menu. Finally click on the "Colors" tab on the window which just opened. After changing the colors to what you want them to be, close the options window and lets get started =D
Do you see the "$" at the end of the first line on the terminal? That means the terminal is waiting for you to command it. Let's not make it wait for too long =D
Make sure the terminal window has your mouse focus by clicking on it, then type:
man
Hopefully the terminal replied like this:
What manual page do you want?
And then displaying your name and the "$" sign once again, ready for the next command.
Now what have you just done? You have told the console to run a file called "man" (stands for manual) and to display the results. Do you want to know where the "man" file is located?
Type in:
which man
And here's what I got:
/usr/bin/man
As you can see, typing in "which" and then a command name will tell you the file where that command is stored. Now let's go back to the "man" command. Typing in "man" and then a command name will tell you everything about that command.
Try typing:
man ls
You will get something which looks like this:

If you look at the bottom left corner, it will tell you what you are looking at and the line you are currently on. You can navigate up and down by using (Surprise!) the UP and DOWN arrow keys. Once you are done reading about the "ls" command you can press Q (as in Quit) to go back to your familiar console. The "man" command is VERY IMPORTANT, use it to check up on commands you don't know about before you use them. ALWAYS.
As you have hopefully figured out by now, the "ls" command lists the files of the directory you are currently looking at. Try it out if you want to =D
That's all nice and good but how do you know in which directory you are at the moment, and how do you change it?
Do a man look up on "pwd" by typing:
man pwd
After reading, press Q to exit, as I told you above.
Hopefully you have figured it out by now, the "pwd" command Prints the Working Directory, so the directory you are currently in.
Try it:
pwd
I got:
/home/simon
Now you could type:
ls
To get a list of files in the /home/simon directory.
Now how do we navigate around our directories?
Use the "cd" command. Typing in "man cd" gets you: "No manual entry for cd", so don't even bother. Instead, read this: Typing "cd" and a sub-directory name will change your current directory to that.
Let's try it =D
Find your current directory by typing:
pwd
Here's mine:
/home/simon
Now type "cd" and a sub-directory:
cd Desktop
Then find your current directory again by typing:
pwd
And be surprised, it changed:
/home/simon/Desktop
Here are some other useful things you can do with the "cd" command:
Type in "cd /" to navigate to the root directory.
Type in "cd .." move to the parent directory.
The End (for now).
What, but there is so much left to learn?!
Yes, there is. I will write more later this week (hopefully). This tutorial was quite fun to write so I think I will make a tutorial series.
In the mean time, look up these basic commands (using "man" or Google):
- echo
- sleep
- su (useful)
- true
- false
- netstat (useful)
- ifconfig (useful)
- ping (somewhat useful)
- open (useful)
- cat (useful)
- mkdir (useful)
- rmdir (useful)
Thursday, April 16, 2009
Myself in Code
// I was bored so I tried to define myself in Java-like Code
while(alive)
{
if(challenge)
{
workhard(challenge);
fun = true;
}
else
{
System.out.println("Bored!");
fun = false;
}
if(getNewIdea() != null){challenge = getNewIdea();}
drinkCofee();
Ego++; // according to my friends =D
}
while(alive)
{
if(challenge)
{
workhard(challenge);
fun = true;
}
else
{
System.out.println("Bored!");
fun = false;
}
if(getNewIdea() != null){challenge = getNewIdea();}
drinkCofee();
Ego++; // according to my friends =D
}
Subscribe to:
Posts (Atom)